Have you ever wondered how to add a touch of style to your kitchen? Well, installing a backsplash is the perfect solution! Whether you’re a seasoned DIY enthusiast or a beginner, this article will guide you through the steps of installing a backsplash in your kitchen. From selecting the right materials to the actual installation process, you’ll find all the information you need to transform your kitchen into a stunning space. So grab your tools and get ready to become a backsplash pro!
Choosing the Right Backsplash Material
When it comes to choosing the right backsplash material, there are several factors to consider. First and foremost, you should think about the overall look and style you want to achieve in your kitchen. Do you prefer a sleek and modern aesthetic or a more traditional and rustic vibe? This will help guide you in selecting a material that complements your existing kitchen decor.
Another important consideration is the durability and maintenance of the material. Some materials, such as ceramic tile or stainless steel, are known for their durability and resistance to stains and scratches. On the other hand, materials like glass or marble may require more delicate care and upkeep.
Lastly, your budget will also play a role in determining the right backsplash material for your kitchen. There are a wide range of materials available at different price points, so it’s important to set a budget and stick to it.
Popular Backsplash Materials
There are numerous options when it comes to backsplash materials, each with its own unique characteristics and benefits. Here are some popular choices:
-
Ceramic tile: Ceramic tile is a classic option that offers versatility in terms of colors, patterns, and finishes. It is durable, easy to clean, and comes in a wide range of price points.
-
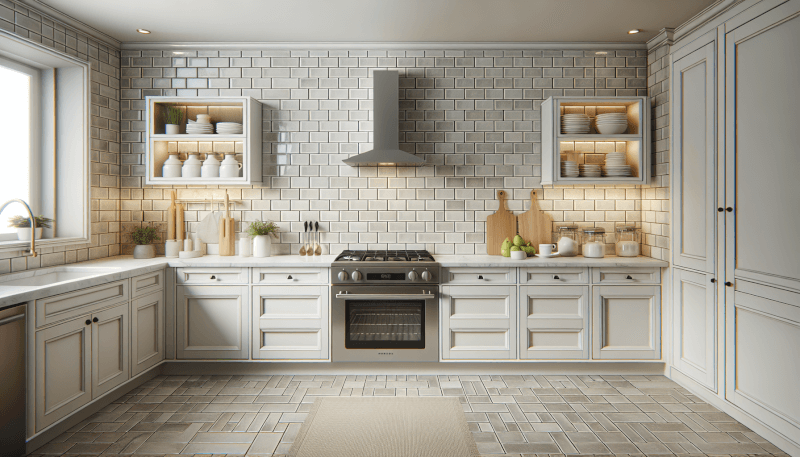
Subway tile: Subway tile is a timeless choice that adds a sleek and clean look to any kitchen. It is typically made of ceramic or glass and comes in various sizes, including the classic 3×6-inch rectangular shape.
-
Natural stone: Natural stone backsplashes, such as marble, travertine, or slate, bring a touch of luxury and sophistication to your kitchen. They are durable and can withstand heat, but they require regular sealing to prevent staining.
-
Stainless steel: For a modern and industrial look, stainless steel is an excellent option. It is resistant to heat and stains, making it a popular choice for professional kitchens.
-
Glass: Glass backsplashes are not only visually stunning, but they also create an illusion of openness and space in your kitchen. They are non-porous and easy to clean, but they may require extra care to prevent scratches.
-
Mosaic tile: Mosaic tiles are small pieces of ceramic, glass, or stone tile arranged in a pattern or design. They add visual interest and can be used to create intricate and unique backsplash designs.
Budget-Friendly Backsplash Options
If you’re on a budget, there are plenty of affordable backsplash options that can still add style and functionality to your kitchen. Here are a few budget-friendly choices:
-
Vinyl peel-and-stick tiles: These self-adhesive tiles are easy to install and come in various designs and colors. They are a cost-effective and temporary option that can be easily changed if you decide to update your kitchen in the future.
-
Paint: Painting your backsplash is a simple and inexpensive way to refresh the look of your kitchen. Choose a high-quality paint that is specifically designed for high-moisture areas, and consider using stencils or painter’s tape to create patterns or designs.
-
Beadboard: Beadboard is a type of paneling that adds a charming and rustic look to your kitchen. It can be painted in any color and is relatively affordable compared to other materials.
-
Laminate: Laminate sheets can mimic the appearance of more expensive materials like stone or tile. They are easy to clean and install, making them an attractive option for those on a budget.
Preparing the Kitchen for Installation
Before you begin installing your backsplash, it’s important to properly prepare your kitchen to ensure a successful and smooth installation process. Here are the steps to follow:
Gathering the necessary tools and materials
Make a list of all the tools and materials you will need for the installation. This may include items such as a measuring tape, tile cutter, adhesive, grout, trowel, sponge, and safety goggles. Having everything you need on hand will save you time and prevent any interruptions during the installation process.
Removing existing backsplash or wall covering
If you have an existing backsplash or wall covering, you’ll need to remove it before installing the new one. Use a putty knife or scraper to gently pry off the old backsplash, being careful not to damage the wall. If the existing backsplash is secured with adhesive, you may need to use a heat gun to soften the adhesive and make it easier to remove.
Cleaning and prepping the wall
Once the old backsplash is removed, it’s essential to clean and prep the wall before installing the new one. Use a mild detergent and warm water to remove any grime or grease, and then dry the wall thoroughly. Next, sand the wall to create a smooth surface for the adhesive to adhere to. Finally, apply a primer to seal the wall and ensure proper adhesion of the new backsplash.
Measuring and Planning the Backsplash Layout
Accurate measurements and careful planning are crucial for a successful backsplash installation. Follow these steps to measure and plan your backsplash layout:
Taking accurate measurements
Using a measuring tape, measure the length and height of the wall area where you will be installing the backsplash. Be sure to account for any outlets or switches, as you will need to cut tiles to fit around them. It’s a good idea to measure multiple times to ensure accuracy.
Determining the layout and design
Consider the overall design and layout of your kitchen when determining the layout of your backsplash. Think about whether you want a simple horizontal or vertical pattern, or if you prefer a more intricate design. You can create a mock layout using tape or cardboard cutouts to visualize how the backsplash will look on your wall.
Creating a template or guide
Before you start installing the backsplash, create a template or guide using a piece of cardboard or a large sheet of paper. This will help you determine the exact placement of the tiles and ensure a straight and even installation. Use a pencil to mark the starting point and any cuts or adjustments that need to be made.
Installing a Tile Backsplash
Tile backsplashes are a popular choice due to their versatility and durability. Here’s a step-by-step guide on how to install a tile backsplash:
Choosing and preparing the tile
Choose the type of tile you want to use for your backsplash, whether it’s ceramic, glass, or natural stone. Measure and mark the tiles that need to be cut to fit around outlets, switches, or corners. Use a tile cutter or wet saw to make the necessary cuts.
Applying the mortar or adhesive
Mix the thin-set mortar or adhesive according to the manufacturer’s instructions. Apply a layer of mortar or adhesive to the wall using a trowel, starting at the marked starting point. Use the notched side of the trowel to create ridges in the mortar, which will help the tiles adhere properly.
Setting and grouting the tiles
Carefully place the tiles onto the mortar or adhesive, starting from the bottom and working your way up. Apply gentle pressure to ensure they adhere securely. Use spacers if desired to maintain consistent grout lines. Allow the mortar or adhesive to dry completely before removing the spacers and applying the grout.
Mix the grout according to the manufacturer’s instructions and apply it to the spaces between the tiles using a grout float. Use a damp sponge to wipe away any excess grout and smooth the surface. Allow the grout to cure for the recommended amount of time before sealing.
Installing a Peel-and-Stick Backsplash
Peel-and-stick backsplashes are a popular choice for their ease of installation and versatility. Here’s how to install a peel-and-stick backsplash:
Preparing the surface
Ensure that the wall surface is clean, dry, and free of any dust or debris. If necessary, use a mild detergent and warm water to remove any grease or grime. Allow the wall to dry completely before proceeding.
Peeling and sticking the backsplash
Start by peeling off a small section of the backing paper from the peel-and-stick backsplash. Align the exposed section with your pre-determined starting point and gently press it against the wall. Slowly peel off the backing paper while continuing to press the backsplash against the wall, smoothing out any air bubbles or wrinkles as you go.
Sealing and finishing the installation
Once the peel-and-stick backsplash is fully applied, use a rubber roller or a clean cloth to firmly press it against the wall, ensuring a secure bond. Trim any excess material using a sharp utility knife or scissors. Finally, apply a silicone caulk along the edges of the backsplash to create a finished look and prevent moisture from seeping behind the tiles.
Installing a Sheet Backsplash
Sheet backsplashes, such as those made of stainless steel or laminate, offer a seamless and contemporary look. Here’s how to install a sheet backsplash:
Cutting and fitting the sheet
Measure and mark the sheet to fit the dimensions of your backsplash area, accounting for any outlets or switches. Use tin snips or a jigsaw with a laminate-cutting blade to cut the sheet according to your measurements.
Applying adhesive and securing the sheet
Apply a construction adhesive or adhesive recommended by the manufacturer to the back of the sheet. Press the sheet firmly against the wall, starting from the bottom and working your way up. Use a roller or a clean cloth to ensure a secure bond between the sheet and the wall.
Trimming and finishing the edges
Once the sheet is fully installed, use a straight edge and a utility knife to trim any excess material along the edges. Be sure to carefully cut around outlets and switches. Finally, install a matching or coordinating trim, such as a metal or laminate edge, to provide a finished look to the sheet backsplash.
Installing a Painted or Wallpaper Backsplash
For those looking for a budget-friendly and customizable option, a painted or wallpaper backsplash can be a great choice. Here’s how to install a painted or wallpaper backsplash:
Preparing the wall surface
Ensure that the wall surface is clean, smooth, and free of any imperfections. Fill in any holes or cracks with spackle or putty, and sand the wall to create a smooth and even surface. Wipe away any dust or residue from sanding.
Painting or applying wallpaper
If you choose to paint your backsplash, start by applying a primer to the wall to ensure proper adhesion and coverage. Once the primer is dry, use a paintbrush or roller to apply your desired paint color. Allow the paint to dry completely before proceeding.
If you prefer wallpaper, measure and cut the wallpaper according to your backsplash dimensions, leaving a few extra inches for trimming. Apply wallpaper adhesive to the back of the wallpaper and carefully press it onto the wall, starting from the top and working your way down. Smooth out any air bubbles using a wallpaper brush or a clean cloth.
Sealing and protecting the backsplash
For painted backsplashes, apply a clear coat or protective sealant to the painted surface once it’s completely dry. This will provide added durability and make the backsplash easier to clean.
For wallpaper backsplashes, apply a wallpaper sealant or clear, water-based polyurethane to protect the wallpaper from moisture and stains. Be sure to follow the manufacturer’s instructions for application and drying time.
Adding Decorative Accents and Edging
Once your backsplash is installed, you can enhance its overall look by adding decorative accents and edging. Here are a few ideas:
Choosing and installing accent tiles
Consider adding accent tiles to create visual interest and enhance the design of your backsplash. Accent tiles can be different in shape, color, or material and can be arranged in a specific pattern or randomly placed throughout the backsplash. Install them using the same adhesive and grouting techniques as the main tiles.
Applying decorative edging
To give your backsplash a polished and finished look, consider installing decorative edging along the top or sides. This can be a metallic trim, a ceramic border, or even a mosaic strip. Choose a material and design that complements your backsplash and overall kitchen decor, and install it using an adhesive suitable for the specific edging material.
Enhancing the backsplash with accessories
Add the finishing touches to your backsplash by incorporating accessories that complement the overall style of your kitchen. This could include open shelving, floating shelves, or even hanging artwork or decorative plates. Use your creativity to showcase your personal style and make your backsplash truly stand out.
Completing the Installation
Once your backsplash is installed, there are a few final steps to complete the installation process:
Cleaning and maintaining the backsplash
Before you start using your kitchen again, thoroughly clean the backsplash with a mild detergent and warm water to remove any residue or adhesive. Be sure to follow the manufacturer’s instructions for cleaning specific materials, such as glass or natural stone.
Sealing the grout or surface
If you installed a tile backsplash, it’s recommended to seal the grout lines to prevent staining and discoloration. Use a grout sealer and apply it according to the manufacturer’s instructions.
For other backsplash materials, such as natural stone or glass, consult the manufacturer’s recommendations for sealing or treating the surface to ensure longevity and maintain its appearance.
Touching up or repairing the backsplash
Inspect your backsplash for any areas that may need touching up or repairs. This could include filling in grout lines that have cracked or replacing tiles that have become damaged. Keep some extra tiles and grout on hand for future repairs.
Common Mistakes to Avoid
While installing a backsplash can be a rewarding DIY project, it’s important to avoid common mistakes that can compromise the overall success of the installation. Here are a few mistakes to watch out for:
Insufficient wall preparation
Skipping proper wall preparation, such as cleaning, priming, or sanding, can lead to poor adhesion and a subpar final result. Take the time to adequately prepare the wall surface to ensure the backsplash adheres properly and lasts for years to come.
Incorrect measurements or layout
Accurate measurements and careful planning are essential for a seamless and visually pleasing backsplash installation. Double-check your measurements and create a template or guide before starting the installation to avoid any unnecessary cutting, adjustments, or uneven placement of tiles or sheets.
Improper adhesive or grouting techniques
Using the wrong type of adhesive or applying it incorrectly can result in tiles or sheets that don’t stick properly to the wall. Similarly, improper grouting techniques can lead to weak or discolored grout lines. Follow the manufacturer’s instructions for the adhesive and grout, and take your time to ensure a strong and aesthetically pleasing finish.
By following these guidelines and avoiding common mistakes, you can achieve a beautiful and functional backsplash that adds style and value to your kitchen. Whether you choose tile, peel-and-stick, sheet, or even a painted or wallpaper backsplash, the end result will be a stunning focal point that enhances your overall kitchen design.
